Table of Contents
The printer was misfeeding multiple pages, and had also failed to pick up the paper. This article explains how to clear a jam, how to clean the printer, how to replace the pickup roller, how to clean the separator pad, and some other troubleshooting techniques.
Clearing the Jam by Removing the Paper
Open the top of the printer and remove the toner cartridge.
Usually, the paper is just not being picked up, or is rolling up partially. The paper is picked up, and pulled up, but not far enough to be grabbed by the next set of rollers.
Remove the paper, and pull the stuck paper out through the paper tray. (Avoid pulling the paper forward, if possible.)
If the paper is torn, there’s some obstruction in the paper path, or the paper misfed, maybe because it was crinkled. Clear out all the bits.
How to Clean the Pickup Roller and Insides
Get a paper towel and dampen it, and squeeze out all the water. You can use this to wipe out any stray toner on the inside.
Next, get another paper towel or cotton swab, and wet it with alcohol. Rub this against the bottom surface of the pickup roller. That’s the rubber thing in the middle of a rod, near the paper.
This pickup roller gets dusty, and may get slick. Cleaning it off could help keep it operational until your new pickup roller is delivered.
How to Clean the Separator Pad
(With the toner and paper removed) Close all the doors on the printer, and flip it over. Remove the power cord.
The blue plastic thing is the separator pad, held in with two screws. Unscrew them and remove. The pad may be dusty; clean it off. Look around inside the cavity to find any bits of paper or other debris that may have fallen into the printer, and remove.
This video shows how to do this.
How to Replace the Pickup Roller
If you’re having persistent jams, and discover that cleaning the pickup roller helps, you should immediately purchase another pickup roller. I have several for sale here: shipped first class, or priority mail, and on eBay. Your purchase helps put money into my pocket 🙂
To remove the roller, watch the video above: you use a screwdriver to gently push aside the tabs that hold the roller in place. There’s one on the left side, and one on the right side. Be gentle.
The roller should pop out, at least slightly. You can then remove the rubber roller, and install a new one.
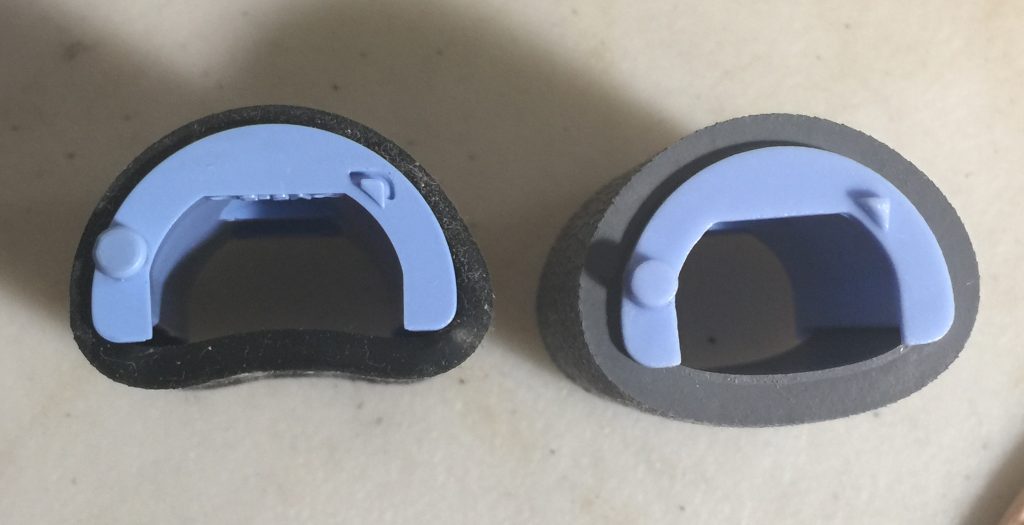
Here’s a photo of my original roller and the new pickup roller unit. The original is on the left, and the rubber is stretched out and thinner. The one on the right is new, and the rubber is sticky, and thick.
Troubleshooting
Printer Feeds Two or Multiple Pages Instead of One Page
The normal fix is to clean off the separator pad. See above about doing this.
Another fix is to pull out the paper, and then “riffle” the edges. Flex the stack of paper to separate the edges. Sometimes, when the paper is cut, two sheets of paper will fuse at the edge.
If you just changed the roller, you may need to use less paper. When you put a new roller in, the rubber is thicker, and that means the pressure on the paper is greater. That means that you may need to reduce the amount paper in the tray.
Printer Stops Feeding Paper when it Runs Low
Sometimes, the printer stops feeding paper when there are several sheets of paper in the tray. Adding paper usually fixes this. It’s also a sign that you need a new feed roller. See above about how to purchase and replace the feed roller.